SQLite学习
SQLite是Android自带的数据库,是学习Android所必须了解的内容之一。
由于JDBC(Java DataBase Connectivity,java数据库连接)是一种用于执行SQL语句的Java API,会消耗太多的系统资源,对于手机这种内存受限设备来说并不合适。因此Android 提供了一些新的 API 来使用 SQLite 数据库。
1
| 数据库存储在 data/data/< 项目文件夹 >/databases/ 下。
|
为了比较好的学习该部分内容我们需要举个例子,所以我们以学生表格(学生表格平时,平时学习最多)为例来学习该内容。
| _id |
uuid |
name |
birth_date |
gender |
| 1 |
12154453131 |
zhangsan |
1309564646 |
0 |
| 2 |
87478478994 |
lisi |
1235465487 |
1 |
定义表格架构
定义表格的话我们先创建学生类,学生类当中有对应的get和set函数,整个类比较简单。
1
2
3
4
5
6
7
8
9
10
11
12
13
14
15
16
17
18
19
20
21
22
23
24
25
26
27
28
29
30
31
32
33
34
35
36
37
38
| public class Student {
private UUID mUUID;
private String mName;
private Date mBirthDate;
private Boolean mGender;
public UUID getUUID() {
return mUUID;
}
public void setUUID(UUID UUID) {
mUUID = UUID;
}
public String getName() {
return mName;
}
public void setName(String name) {
mName = name;
}
public Date getBirthDate() {
return mBirthDate;
}
public void setBirthDate(Date birthDate) {
mBirthDate = birthDate;
}
public Boolean getGender() {
return mGender;
}
public void setGender(Boolean mgender) {
this.mGender = mgender;
}
}
|
对于数据库我们创建StudentSchema类,将需要的表名和表字段放在一起
1
2
3
4
5
6
7
8
9
10
11
12
13
14
15
16
17
18
19
20
21
| package com.example.sqlitelearn;
public class StudentSchema {
public static final class StudentTable {
public static final String TABLE_NAME = "Student";
public static final class Cols {
public static final String UUID = "uuid";
public static final String NAME = "name";
public static final String BIRTH_DATE = "birth_date";
public static final String GENDER = "gender";
}
}
}
|
为啥这样放呢,我看官方的例子和《Android权威编程指南》上使用的类都是这样,上面的解释是说有了这些数据表元素,就可以在Java代码中安全地引用,比如:StudentTable.Cols.NAME就是指向student的name字段,并且这还给修改字段名称或新增表元素带来了方便。
创建数据库
编写建表语句
创建数据库需要先写对应的语句
1
2
3
4
5
6
7
8
9
10
11
12
13
14
15
16
17
18
|
private static final String SQL_CREATE_ENTRIES =
"CREATE TABLE " + StudentTable.TABLE_NAME + " (" +
"_id integer primary key autoincrement," +
StudentTable.Cols.UUID + "," +
StudentTable.Cols.NAME + "," +
StudentTable.Cols.BIRTH_DATE + "," +
StudentTable.Cols.GENDER + "," +
")";
private static final String SQL_DELETE_ENTRIES =
"DROP TABLE IF EXISTS " + StudentTable.TABLE_NAME;
|
继承SQLiteDatabase
编写数据库语句之后我们需要创建一个SQLiteDatabase实例,然后才能进行数据库相关得创建和操作,这个可以使用Android提供的Context底层方法openOrCreateDatabase(...)和databaseList(),打开数据库文件并将其转化为SQLiteDatabase实例,但是推荐的做法是使用SQLiteOpenHelper来辅助我们完成数据库表的创建和删除。
SQLiteOpenHelper是一个抽象类,我们创建StudentBaseHelper来继承它。继承之后必须完成构造函数 、onCreate和onUpgrade
函数
1
2
3
4
5
6
7
8
9
10
11
12
13
14
15
16
17
18
19
20
21
22
23
24
25
26
27
28
29
30
31
32
33
34
35
36
37
38
39
40
| public class StudentBaseHelper extends SQLiteOpenHelper {
private static final int VERSION = 1;
private static final String DATABASE_NAME = "studentBase.db";
private static final String SQL_CREATE_ENTRIES =
"CREATE TABLE " + StudentTable.TABLE_NAME + " (" +
"_id integer primary key autoincrement," +
StudentTable.Cols.UUID + "," +
StudentTable.Cols.NAME + "," +
StudentTable.Cols.BIRTH_DATE + "," +
StudentTable.Cols.GENDER + "," +
")";
private static final String SQL_DELETE_ENTRIES =
"DROP TABLE IF EXISTS " + StudentTable.TABLE_NAME;
public StudentBaseHelper(Context context) {
super(context, DATABASE_NAME, null, VERSION);
}
@Override
public void onCreate(SQLiteDatabase db) {
db.execSQL(SQL_CREATE_ENTRIES);
}
@Override
public void onUpgrade(SQLiteDatabase db, int oldVersion, int newVersion) {
if (oldVersion < newVersion) {
db.execSQL(SQL_DELETE_ENTRIES);
onCreate(db);
}
}
}
|
onCreate(SQLiteDatabase)方法负责创建初始数据库,代码比较简单。
onUpgrade(SQLiteDatabase, int, int)方法负责与升级相关的工作,比如:我们后续如果后续如果升级了软件的版本,就需要调用这个方法,在这里我们采取的方法是先删除再创建,这样会把原来的表删除再创建一个,这样的话会使用原来的数据消失,不过在这里是给定一个例子所以不用考虑这么多,现实中开发的话,数据也会在后端保存在数据库上,在Android部分也只起到一个缓存作用所以不需要担心。
目前我想实验调用onUpgrade方法,但是改变版本号之后该方法也没有被调用不知道是为啥,可能需要手动调用
接着我们在MainActivity中实例化SQLiteOpenHelper,然后创建SQLiteDatabase实例
1
2
3
4
5
6
7
8
9
10
11
| public class MainActivity extends AppCompatActivity {
private SQLiteDatabase mDatabase;
@Override
protected void onCreate(Bundle savedInstanceState) {
super.onCreate(savedInstanceState);
setContentView(R.layout.activity_main);
mDatabase = new StudentBaseHelper(this).getWritableDatabase();
}
}
|
运行结果
运行程序之后
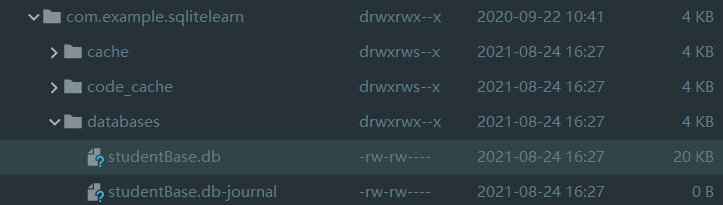
可以查看到studentBase.db生成了
插入数据库
数据的增删改查操作,先讲解插入操作
使用 ContentValues
负责处理数据库写入和更新操作的辅助类是ContentValues。它是一个键值存储类,类似于 Java的HashMap和前面用过的Bundle。不同的是,ContentValues只能用于处理SQLite数据。
1
2
3
4
5
6
7
8
| private static ContentValues getContentValues(Student student) {
ContentValues values = new ContentValues();
values.put(StudentTable.Cols.UUID, student.getUUID().toString());
values.put(StudentTable.Cols.NAME, student.getName());
values.put(StudentTable.Cols.BIRTH_DATE, student.getBirthDate().getTime());
values.put(StudentTable.Cols.GENDER, student.getGender() ? 1 : 0);
return values;
}
|
编写插入代码
插入调用insert(String, String, ContentValues)方法就行,方法的第一和第三个参数很重要,第二个很少用到。传入的第一个参数是数据表名(StudentTable.TABLE_NAME),第三个是要写入的数据。第二个参数使用可以参考官方文档👉https://developer.android.com/reference/android/database/sqlite/SQLiteDatabase#insert(java.lang.String,%20java.lang.String,%20android.content.ContentValues)
insert(String, String, ContentValues)方法的返回值是long类型,代表新插入行的行 ID,并且如果发生错误,则返回-1
我们可以写出该方法
1
2
3
4
5
| public long addStudent(Student student) {
ContentValues values = getContentValues(student);
long newRowId = mDatabase.insert(StudentTable.TABLE_NAME, null, values);
return newRowId;
}
|
然后在onCreate中进行调用
1
2
3
4
5
6
7
8
9
10
11
12
13
14
15
16
17
18
19
20
| @Override
protected void onCreate(Bundle savedInstanceState) {
super.onCreate(savedInstanceState);
setContentView(R.layout.activity_main);
mDatabase = new StudentBaseHelper(this).getWritableDatabase();
Student student = new Student();
student.setUUID(UUID.randomUUID());
student.setName("zhangsan");
student.setBirthDate(new Date());
student.setGender(true);
long id = addStudent(student);
if (id == -1) {
Log.d(TAG, "add student fail");
} else {
Log.d(TAG, "add student success and id=" + id);
}
}
|
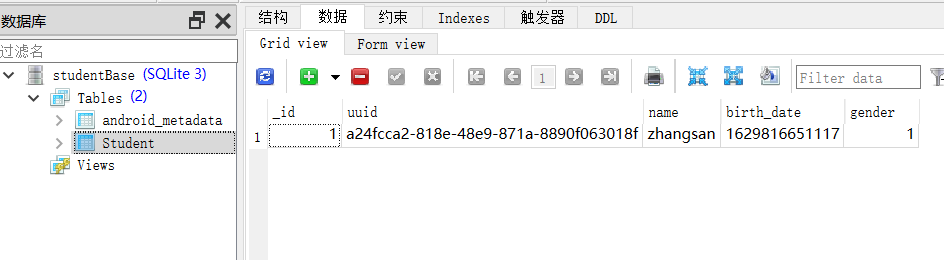
运行结果

使用SQLiteStudio进行查看生成的db文件
从数据库中读取信息
query函数
读取数据需要用到SQLiteDatabase.query(...)方法。这个方法有好几个重载版本,具体的需要查询官方提供的文档,该方法会返回一个Cursor类型。我们本次使用的使用的query是下面那个版本
1
2
3
4
5
6
7
8
9
| public Cursor query(
String table, //数据库表名
String[] columns, //查询的列名,如果为null,则返回所以列
String where, //where条件语句,其中有?作为占位符
String[] whereArgs, //对应占位符相应的内容
String groupBy, //分组
String having,
String orderBy, //排序
String limit)
|
如果学过数据库,应该对上面这些参数都比较熟悉,具体需要向数据库方面细讲,这里就不展开了。
编写对应的函数
1
2
3
4
5
6
7
8
9
10
11
12
| private Cursor queryStudents(String whereClause, String[] whereArgs) {
Cursor cursor = mDatabase.query(
StudentTable.TABLE_NAME,
null,
whereClause,
whereArgs,
null,
null,
null
);
return cursor;
}
|
使用的时候需要这样使用
1
| Cursor cursor = queryStudents(StudentTable.Cols.NAME + "=?", new String[]{"zhangsan"});
|
使用CursorWrapper
Cursor在我理解看来有点类似于数据库中的游标,由于从Curor中提取的代码都类似基本上都是调用cursor.getColumnIndex方法,所以我们可以考虑使用CursorWrapper里面提供一些封装好了函数,方便我们使用。
1
2
3
4
5
6
7
8
9
10
11
12
13
14
15
16
17
18
19
20
21
22
23
24
25
26
|
public class StudentCursorWrapper extends CursorWrapper {
public StudentCursorWrapper(Cursor cursor) {
super(cursor);
}
public Student getStudent() {
String uuidString = getString(getColumnIndex(StudentTable.Cols.UUID));
String name = getString(getColumnIndex(StudentTable.Cols.NAME));
long date = getLong(getColumnIndex(StudentTable.Cols.BIRTH_DATE));
int gender = getInt(getColumnIndex(StudentTable.Cols.GENDER));
Student student = new Student();
student.setUUID(UUID.fromString(uuidString));
student.setName(name);
student.setBirthDate(new Date(date));
student.setGender(gender != 0);
return student;
}
}
|
运行结果
我们在onCreate中调用这个代码
1
2
3
4
5
6
7
8
9
10
11
12
13
14
15
16
17
18
19
20
21
22
23
24
25
26
27
28
29
30
31
32
33
34
35
36
| @Override
protected void onCreate(Bundle savedInstanceState) {
super.onCreate(savedInstanceState);
setContentView(R.layout.activity_main);
mDatabase = new StudentBaseHelper(this).getWritableDatabase();
Cursor cursor = queryStudents(StudentTable.Cols.NAME + "=?", new String[]{"zhangsan"});
StudentCursorWrapper cursorWrapper = new StudentCursorWrapper(cursor);
try {
if (cursor.getCount() == 0) {
Log.d(TAG, "查无此人");
} else {
cursorWrapper.moveToFirst();
Student student = cursorWrapper.getStudent();
Log.d(TAG, student.getUUID().toString());
}
} finally {
cursorWrapper.close();
}
}
|
我们查询zhangsan并打印他的uuid,结合前面使用SQLiteStudio查看的信息,发现是一样的,也说明了我们访问到了数据库中的信息,如果需要访问不要信息,只需要写不同的where语句就行,这部分自行查阅数据库知识。

更新数据库
update函数
更新数据库信息使用的是update函数,该函数有点类似于insert()函数,但是其中的whereClause和whereArgs有点类似于query()函数,简单理解就是通过whereClause和whereArgs查询对应的数据,并把他们更改为values,这个int类型的返回值代表影响了多少行
1
2
3
4
| public int update (String table,
ContentValues values,
String whereClause,
String[] whereArgs)
|
编写更新代码
1
2
3
4
5
6
7
8
| private int updateStudent(Student student) {
String uuidString = student.getUUID().toString();
ContentValues values = getContentValues(student);
int count = mDatabase.update(StudentTable.TABLE_NAME, values,
StudentTable.Cols.UUID + "=?",
new String[]{uuidString});
return count;
}
|
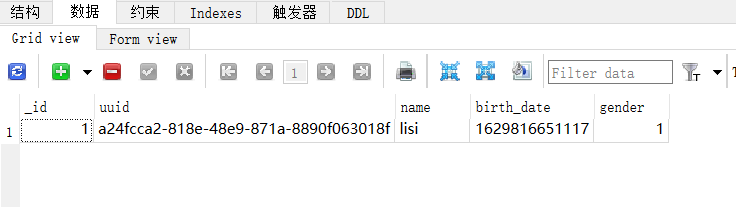
运行结果
我们查找zhangsan并且把他名字改为lisi
1
2
3
4
5
6
7
8
9
10
11
12
13
14
15
16
17
18
19
20
21
22
23
24
25
26
27
28
29
30
31
32
33
34
35
36
| @Override
protected void onCreate(Bundle savedInstanceState) {
super.onCreate(savedInstanceState);
setContentView(R.layout.activity_main);
mDatabase = new StudentBaseHelper(this).getWritableDatabase();
Cursor cursor = queryStudents(StudentTable.Cols.NAME + "=?", new String[]{"zhangsan"});
StudentCursorWrapper cursorWrapper = new StudentCursorWrapper(cursor);
Student student = null;
try {
if (cursor.getCount() == 0) {
Log.d(TAG, "查无此人");
} else {
cursorWrapper.moveToFirst();
student = cursorWrapper.getStudent();
Log.d(TAG, student.getUUID().toString());
}
} finally {
cursorWrapper.close();
}
student.setName("lisi");
updateStudent(student);
}
|
可以看到更改成功
删除数据库中相关信息
删除函数调用的是delete()函数,看了前面的查找和更新后删除函数还是比较简单的,
1
2
3
| public int delete (String table,
String whereClause,
String[] whereArgs)
|
编写删除代码
1
2
3
| private int deleteStudent(String whereClause, String[] whereArgs) {
return mDatabase.delete(StudentTable.TABLE_NAME, whereClause, whereArgs);
}
|
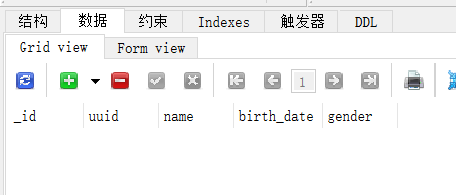
运行结果
我们运行
1
2
3
4
| deleteStudent(
StudentTable.Cols.NAME + "=?",
new String[]{"lisi"}
);
|
总结
SQLite数据库的增删改查总算大功告成,自己照着书上学的写也学到一些知识,不过现在官方好像推荐使用Room进行持久化,等有空再研究一下这个
参考: