快捷键
查看类的结构
方法1:
- Windows: alt + 7
- Mac:cmd + 7
方法2:
- Windows:ctrl + F12
- Mac:cmd + F12
查看继承关系
- Windows:ctrl + h
- Mac:control + h
查看类和接口被哪些子类实现的快捷键
Ctrl+alt +B
去Oracle官网下载自己需要的java版本
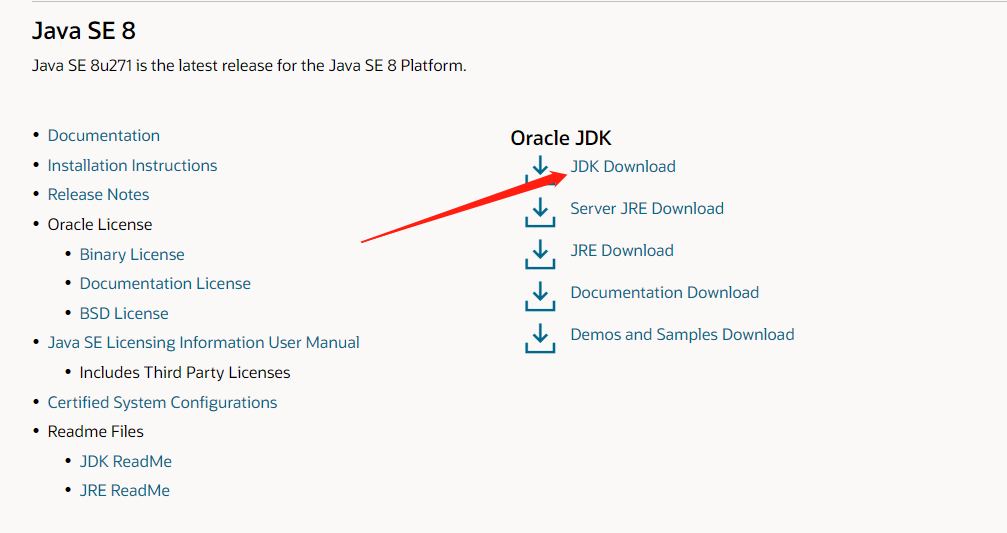
我这里选择的是windows的jdk8

ps:下载需要登录自己Oracle账号,注册登录一下就行
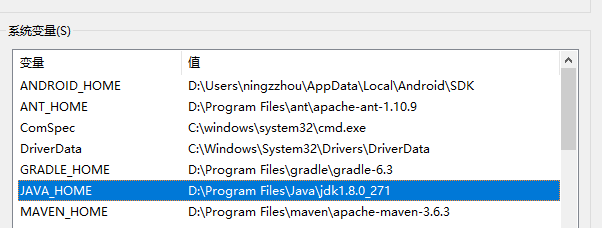
下载之后的exe文件双击开,安装到你需要安装的位置即可,我这里安装位置是
D:\Program Files\Java\jdk1.8.0_271
在系统变量里面加入了变量JAVA_HOME,值为安装的位置
然后在Path里面加入了%JAVA_HOME%\bin和%JAVA_HOME%\jre\bin(这个有待商量)

在cmd当中输入java -version和javac -version查看输出,如果有如下的输出说明配置正确
java -version:
1 | java version "1.8.0_271" |
javac -version:
1 | javac 1.8.0_271 |
直接去官网,下载installer.exe或者zip都可以,我这里是下载的zip。
然后找个合适的位置解压,解压完之后是这个样子
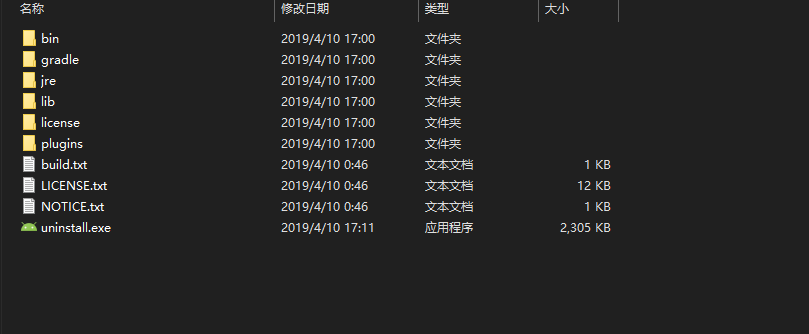
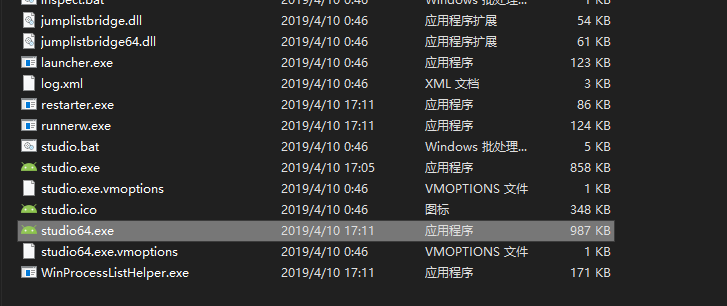
我们进入bin文件点击studio64.exe就可以运行
第一次运行可能会下载一些sdk等东西,这里的话只需要记得更改sdk下载位置,别下载到c盘就行。
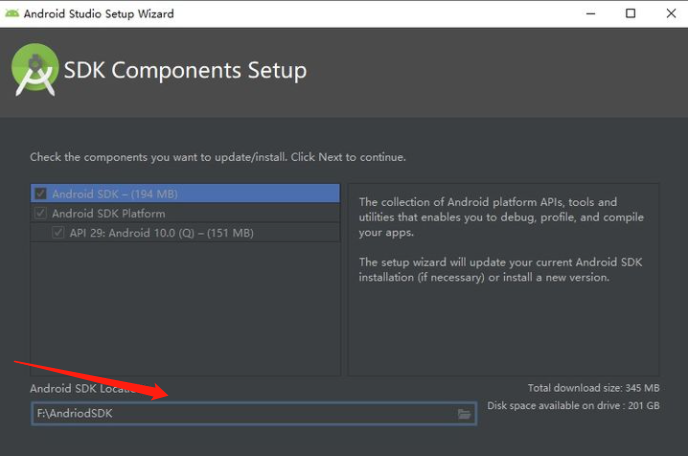
ps:网络可能会导致很难下载下来,这个可以通过设置镜像等方法解决
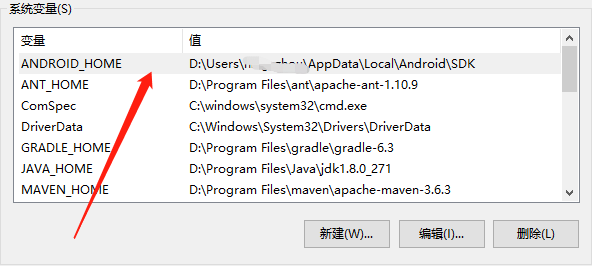
Android 环境配置主要配置sdk的环境变量,跟上面java环境配置类似,在系统变量中加入ANDROID_HOME对应着sdk安装位置
然后在path当中加入%ANDROID_HOME%\platform-tools和%ANDROID_HOME%\tools
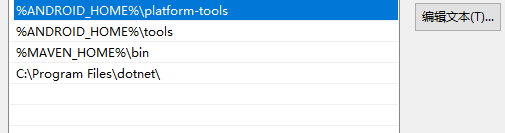
在cmd当中输入adb,然后输出类似如下信息
1 | Android Debug Bridge version 1.0.41 |
更多环境变量配置可以参考官网:https://developer.android.com/studio/command-line/variables?hl=zh-cn
Android studio因为经常需要安装,所以记录一下
最近在学习spring,学了又忘,忘了又学,还是需要做做总结,动动手知识才能变成自己的。
我们的需求是创建一个User的对象,其中User只有一个属性name
User代码:
1 | package com.zhouning.spring.beans; |
bean.xml
1 |
|
调用:
1 | public static void main(String[] args) { |
输出:
1 | 调用了无参构造方法 |
需要注意的点:
set方法才能对属性进行设置<property name="name" value="张三"></property>中,name="name",这个引号中的name是对应的set方法去掉set后第一个字母小写(当然大写也可以),如:我这里面的set方法是setNmae,所以对应name="name";如果set方法是setNName,则对应的写法是name="NName"User代码:
1 | package com.zhouning.spring.beans; |
1 |
|
1 |
|
1 |
|
这三种方法最后的输出都是:
1 | 调用了有参构造方法 |
<constructor-arg name="name" value="李四" type="java.lang.String"></constructor-arg>,这样可以应对有点时候类型不确定等情况。静态工厂
创建静态工厂类UserFactory:
1 | /** |
bean.xml:
1 |
|
动态工厂
创建动态工厂类UserDynamicFactory:
1 | public class UserDynamicFactory { |
bean.xml:
1 |
|
需要注意的地方:
spring中ioc创建对象的方法总共是三类6种,总结一下。千里之行始于足下,加油!
对自己学习的spring的简单配置做一下小总结,后面有可以继续加
bean.xml
1 |
|
id是bean的标识符,如果设置需要唯一(就是说不能同时设置两个id一样的bean)。id,但是设置了name,那么name是bean的默认标识符(充当id的作用)。id,又设置了name那么name就是别名,这时可以设置多个别名,使用分隔符空格、逗号、分号隔开。alias也是设置别名用的,用法如上。id也不配置name,那么可以根据applicationContext.getBean(class)获取对象。1 | <import resource="applicationContext.xml"></import> |
这个是在团队协作的时候使用的
目前就只写了,两个以后需要注意的时候再慢慢加。
主要对spring当中各种各样数据注入的讲解,比如:数组、List、Map、Set等,他们的注入方法有相同的地方也有一些简单的区别,自己手动写一下方便后面忘记了。
我们的需求是设计一个学生类,然后学生的信息有姓名、地址、书本、爱好等
Student代码如下:
1 | /*** |
其中Address代码:
1 | public class Address { |
配置文件:
1 |
|
1 | <!-- 对于普通的变量“name”进行注入--> |
常量注入是对普通类型的注入,比如:String、int、float等
1 | <!-- 对于bean的注入--> |
bean的注入是先创建其他的bean,然后使用ref进行引用注入
1 | <!-- 对于数组的注入--> |
数组注入比较简单
1 | <!-- 对于list注入--> |
注入比较简单
1 | <!-- 对于map注入--> |
Map注入时元素是entry,然后分别对entry里面的key和value注入就行
1 | <!-- 对于set的注入--> |
set注入和前面的数组和list注入差不多
1 | <!-- null注入--> |
null注入九比较鸡肋了,一般来说你不注入他本身也应该是null
1 | <!-- Properties注入--> |
Properties类似于Map的配置
1 | <!-- p命名空间注入--> |
p命名空间的注入需要添加一下xmlns:p="http://www.springframework.org/schema/p",p其实是属性的意思。
1 | <!-- c命名空间注入--> |
c命名空间注入需要添加一下xmlns:c="http://www.springframework.org/schema/c",c命名空间注入需要有构造函数的支撑,c就是构造函数的意思。
总结一下学习的spring的注入方法,其中如果对属性进行注入一定需要有Set方法,如果对构造函数进行注入,则一定有对应的构造方法,继续学习spring当中。
spring中的bean有作用域的限制,平时我们可能不经常使用,但是作为学习我们还是需要学习一下
平时我们创建spring的时候可能如下:
1 | <bean id="user" class="com.zhouning.spring.beans.User" scope="singleton"> |
其中scope代表的就是作用域,作用域比较常见的有:singleton、prototype等
singleton
单例,整个容器当中只有一个对象的实例,默认情况下bean的作用域就是单例
prototype
原型,每次获取bean都会产生一个新的对象
request
每次请求时都会创建一个新的对象
session
在会话范围内时一个对象
global session
只在portlet下有用
application
在应用范围中一个对象
为了解决bean每次都配置的那么麻烦,spring提供了一个自动装配的功能,个人感觉功能页有一些鸡肋
假设我们有一个User类,然后里面有两个属性分别是名字和地址
User:
1 | package com.zhouning.spring.beans; |
Address:
1 | package com.zhouning.spring.beans; |
三种方法:
byName
根据名称(set方法)去查找对应的bean,如果有则装配
1 |
|
对应着User里面的public void setAddr(String addr)
byType
更加类型进行自动装配,不需要管bean的id,但是一种类型的bean只能有一个,不然会报错。
1 |
|
对应着User里面的public void setAddr(String addr)
constructor
当构造器实例化时,进行自动装配,需要有对应的构造函数
1 |
|
对应着User里面的public User(Address address)
bean在xml中的自动注入都是通过这种方法,但是感觉不是很常用。
aop(aspect oriented programming)面向切面编程是spring当中一个重要内容,在学习之后感觉这个思想挺不错的,做个总结
听说过面向对象编程(oop),但是面向切面编程还真是第一次听说,那面向切面编程到底是什么呢?
面向切面编程是一种横向的编程方式,横向是一种平行的意思。在spring当中有很多的竖向的图,如下:

action中会调用到service,service当中会调用到dao,这样的类似一层一层的在spring当中认为是一种竖向编程,竖向编程结构清晰。
横向编程类似于下面这种,在service和log是两个模块,两者独立,但是在service调用的时候,希望能够通过log模块打印日志信息,我们将l当作一个切面横插进去,就是一种横向编程的思维。

这样编程的好处就是真实角色处理的业务更加纯粹,不用去关注一些公共的事情(如:日志、安全、缓存等),其实和前面所讲的java代理的作用相同。
log连接到seervice上。代码实现都是使用idea作为ide实现的,其中怎么创建可以参考这篇文章,然后我们目前的需求就是创建一个ArithmeticCalculator进行加减乘除,然后在ArithmeticCalculator里面插入log
先创建接口ArithmeticCalculator
1 | package com.zhouning; |
使用类去实现
1 | package com.zhouning; |
通过springAPI来实现
API实现的话我们首先需要实现相对应的接口,如:MethodBeforeAdvice(前置通知),可以参考官方文档上的接口介绍,我这里实现的是前置通知的接口。
Log:
1 | package com.zhouning.log; |
对应的配置:
1 |
|
调用:
1 | public static void main(String[] args) { |
输出:
1 | com.zhouning.ArithmeticCalculatorImpl的add方法被调用 |
需要注意的点:
spring—aop需要的包一定要导入正确,开始我有个包没有导入,导致弄了半天
一定要在xsi:schemaLocation上加入http://www.springframework.org/schema/aop http://www.springframework.org/schema/aop/spring-aop.xsd
表达式execution()中参数介绍:第一个*代表返回值不限;第二个*代表方法;括号中的..代表参数
这种直接使用SpringAPI的方法使用不多
自定义类实现(基于配置文件)
第一种方法虽然也能够使用,但是用起来还是比较麻烦的,如果通知多了继承的接口也会增加,所以采取自定义类的方法要简单一些。
新建一个LoggingAspect:
1 | package com.zhouning.log; |
配置文件:
1 | <?xml version="1.0" encoding="UTF-8"?> |
调用方法不变,输出:
1 | 前置通知: The method add begins with [1, 1] |
这样似乎体现不出异常通知的作用,所以改变一下调用方式:
1 | public static void main(String[] args) { |
输出:
1 | 前置通知: The method div begins with [10, 0] |
可以看到“返回通知”没有了,但是后置通知依旧存在。
这时候忽然想到另外一个问题,如果我有两个Aspect该怎么办?该如何控制两个Aspect中相对应的执行顺序呢?
其实spring可我们以及提供了控制两个Aspect的方法那就是order,我们可以通过,对order设置大小从而决定顺序,order越小等级越高也就越先执行。
通过注解实现
更改LoggingAspect代码:
1 | package com.zhouning.log; |
配置文件:
1 |
|
输出跟上面相同
注意的地方:
<aop:aspectj-autoproxy></aop:aspectj-autoproxy>@Pointcut是切面表达式,使用之后后面的表达式可以简化有多个Aspect的情况
如果是多个Aspect,想要有执行的顺序,可以设置order指定切面的优先级, 值越小优先级越高。
如创建一个VlidationAspect:
1 |
|
或者通过配置文件xml指定:
1 | <!-- 配置 AOP --> |
简单的学习了一下spring—aop的内容,aop的内部原理其实就是动态代理不过通过spring实现起来更加简单,感觉aop还是挺有用的,其实还有许多细节有待弄清,写的比较多也有点乱,等以后有新的体会后再补一下。加油!
Spring 是一种轻量级开发框架,旨在提高开发人员的开发效率以及系统的可维护性。Spring 官网:https://spring.io/。
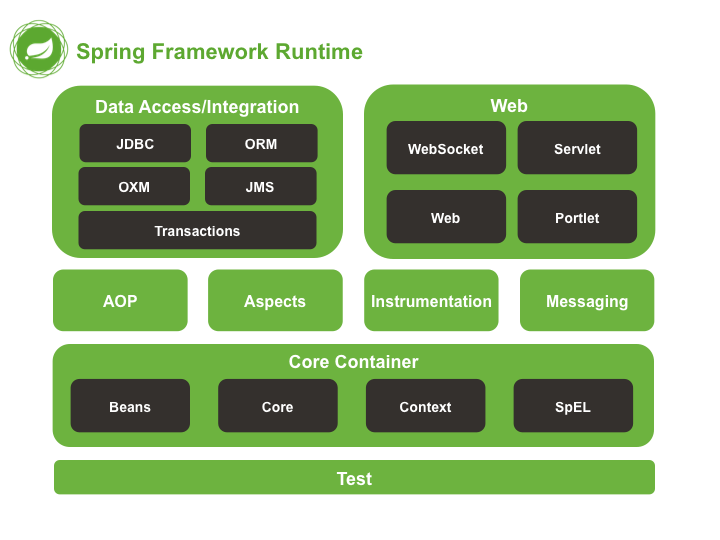
我们一般说 Spring 框架指的都是 Spring Framework,它是很多模块的集合,使用这些模块可以很方便地协助我们进行开发。这些模块是:核心容器、数据访问/集成,、Web、AOP(面向切面编程)、工具、消息和测试模块。比如:Core Container 中的 Core 组件是Spring 所有组件的核心,Beans 组件和 Context 组件是实现IOC和依赖注入的基础,AOP组件用来实现面向切面编程。
Spring 官网列出的 Spring 的 6 个特征:
下图对应的是 Spring4.x 版本。目前最新的5.x版本中 Web 模块的 Portlet 组件已经被废弃掉,同时增加了用于异步响应式处理的 WebFlux 组件。
@Controller 返回一个页面
单独使用 @Controller 不加 @ResponseBody的话一般使用在要返回一个视图的情况,这种情况属于比较传统的Spring MVC 的应用,对应于前后端不分离的情况。
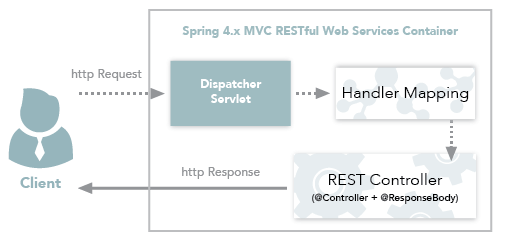
@RestController 返回JSON 或 XML 形式数据
但@RestController只返回对象,对象数据直接以 JSON 或 XML 形式写入 HTTP 响应(Response)中,这种情况属于 RESTful Web服务,这也是目前日常开发所接触的最常用的情况(前后端分离)。
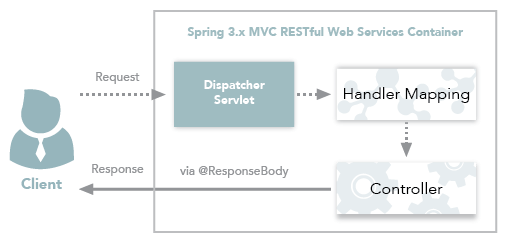
@Controller +@ResponseBody 返回JSON 或 XML 形式数据
如果你需要在Spring4之前开发 RESTful Web服务的话,你需要使用@Controller 并结合@ResponseBody注解,也就是说@Controller +@ResponseBody= @RestController(Spring 4 之后新加的注解)。
@ResponseBody注解的作用是将Controller的方法返回的对象通过适当的转换器转换为指定的格式之后,写入到HTTP 响应(Response)对象的 body 中,通常用来返回 JSON 或者 XML 数据,返回 JSON 数据的情况比较多。
Reference:
IoC(Inverse of Control:控制反转)是一种设计思想,就是 将原本在程序中手动创建对象的控制权,交由Spring框架来管理。 IoC 在其他语言中也有应用,并非 Spring 特有。 IoC 容器是 Spring 用来实现 IoC 的载体, IoC 容器实际上就是个Map(key,value),Map 中存放的是各种对象。
将对象之间的相互依赖关系交给 IoC 容器来管理,并由 IoC 容器完成对象的注入。这样可以很大程度上简化应用的开发,把应用从复杂的依赖关系中解放出来。 IoC 容器就像是一个工厂一样,当我们需要创建一个对象的时候,只需要配置好配置文件/注解即可,完全不用考虑对象是如何被创建出来的。 在实际项目中一个 Service 类可能有几百甚至上千个类作为它的底层,假如我们需要实例化这个 Service,你可能要每次都要搞清这个 Service 所有底层类的构造函数,这可能会把人逼疯。如果利用 IoC 的话,你只需要配置好,然后在需要的地方引用就行了,这大大增加了项目的可维护性且降低了开发难度。
Spring 时代我们一般通过 XML 文件来配置 Bean,后来开发人员觉得 XML 文件来配置不太好,于是 SpringBoot 注解配置就慢慢开始流行起来。
推荐阅读:https://www.zhihu.com/question/23277575/answer/169698662
Spring IoC的初始化过程:

IoC源码阅读
AOP(Aspect-Oriented Programming:面向切面编程)能够将那些与业务无关,却为业务模块所共同调用的逻辑或责任(例如事务处理、日志管理、权限控制等)封装起来,便于减少系统的重复代码,降低模块间的耦合度,并有利于未来的可拓展性和可维护性。
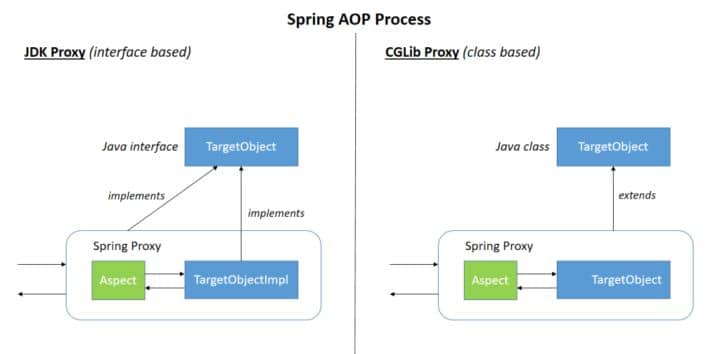
Spring AOP就是基于动态代理的,如果要代理的对象,实现了某个接口,那么Spring AOP会使用JDK Proxy,去创建代理对象,而对于没有实现接口的对象,就无法使用 JDK Proxy 去进行代理了,这时候Spring AOP会使用Cglib ,这时候Spring AOP会使用 Cglib 生成一个被代理对象的子类来作为代理,如下图所示:
当然你也可以使用 AspectJ ,Spring AOP 已经集成了AspectJ ,AspectJ 应该算的上是 Java 生态系统中最完整的 AOP 框架了。
使用 AOP 之后我们可以把一些通用功能抽象出来,在需要用到的地方直接使用即可,这样大大简化了代码量。我们需要增加新功能时也方便,这样也提高了系统扩展性。日志功能、事务管理等等场景都用到了 AOP 。
Spring AOP 属于运行时增强,而 AspectJ 是编译时增强。 Spring AOP 基于代理(Proxying),而 AspectJ 基于字节码操作(Bytecode Manipulation)。
Spring AOP 已经集成了 AspectJ ,AspectJ 应该算的上是 Java 生态系统中最完整的 AOP 框架了。AspectJ 相比于 Spring AOP 功能更加强大,但是 Spring AOP 相对来说更简单,
如果我们的切面比较少,那么两者性能差异不大。但是,当切面太多的话,最好选择 AspectJ ,它比Spring AOP 快很多。
大部分时候我们并没有在系统中使用多线程,所以很少有人会关注这个问题。单例 bean 存在线程问题,主要是因为当多个线程操作同一个对象的时候,对这个对象的非静态成员变量的写操作会存在线程安全问题。
常见的有两种解决办法:
@Component 注解作用于类,而@Bean注解作用于方法。@Component通常是通过类路径扫描来自动侦测以及自动装配到Spring容器中(我们可以使用 @ComponentScan 注解定义要扫描的路径从中找出标识了需要装配的类自动装配到 Spring 的 bean 容器中)。@Bean 注解通常是我们在标有该注解的方法中定义产生这个 bean,@Bean告诉了Spring这是某个类的示例,当我需要用它的时候还给我。@Bean 注解比 @Component 注解的自定义性更强,而且很多地方我们只能通过 @Bean 注解来注册bean。比如当我们引用第三方库中的类需要装配到 Spring容器时,则只能通过 @Bean来实现。@Bean注解使用示例:
1 |
|
上面的代码相当于下面的 xml 配置
1 | <beans> |
下面这个例子是通过 @Component 无法实现的。
1 |
|
我们一般使用 @Autowired 注解自动装配 bean,要想把类标识成可用于 @Autowired 注解自动装配的 bean 的类,采用以下注解可实现:
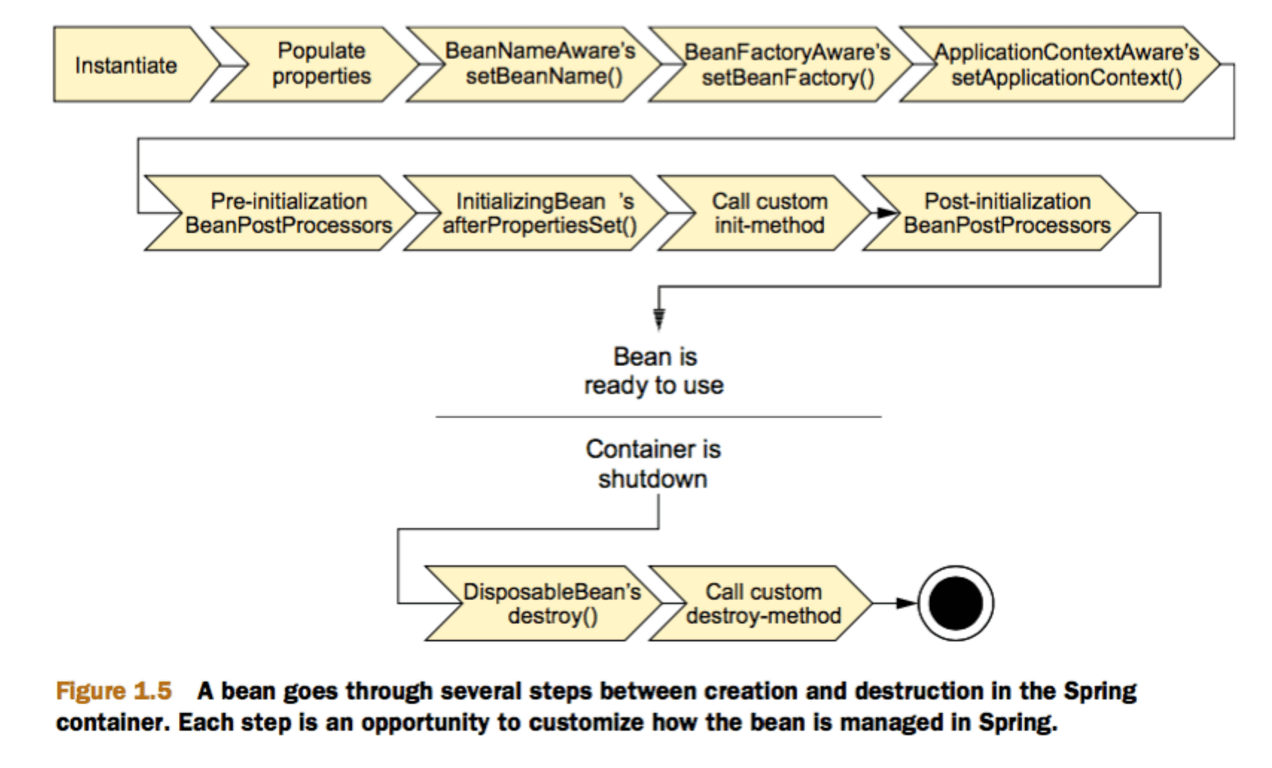
@Component :通用的注解,可标注任意类为 Spring 组件。如果一个Bean不知道属于哪个层,可以使用@Component 注解标注。@Repository : 对应持久层即 Dao 层,主要用于数据库相关操作。@Service : 对应服务层,主要涉及一些复杂的逻辑,需要用到 Dao层。@Controller : 对应 Spring MVC 控制层,主要用户接受用户请求并调用 Service 层返回数据给前端页面。这部分网上有很多文章都讲到了,下面的内容整理自:https://yemengying.com/2016/07/14/spring-bean-life-cycle/ ,除了这篇文章,再推荐一篇很不错的文章 :https://www.cnblogs.com/zrtqsk/p/3735273.html 。
set()方法设置一些属性值。BeanNameAware 接口,调用 setBeanName()方法,传入Bean的名字。BeanClassLoaderAware 接口,调用 setBeanClassLoader()方法,传入 ClassLoader对象的实例。*.Aware接口,就调用相应的方法。BeanPostProcessor 对象,执行postProcessBeforeInitialization() 方法InitializingBean接口,执行afterPropertiesSet()方法。BeanPostProcessor 对象,执行postProcessAfterInitialization() 方法DisposableBean 接口,执行 destroy() 方法。图示:
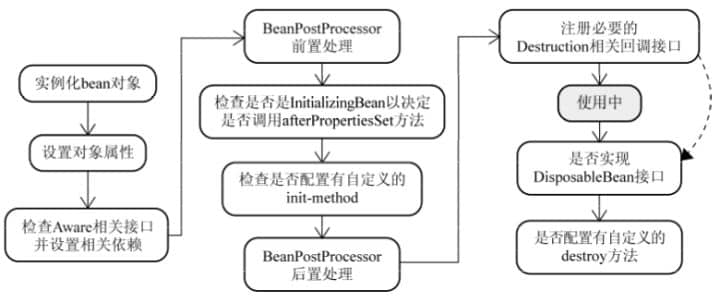
与之比较类似的中文版本:
谈到这个问题,我们不得不提提之前 Model1 和 Model2 这两个没有 Spring MVC 的时代。
Model2 模式下还存在很多问题,Model2的抽象和封装程度还远远不够,使用Model2进行开发时不可避免地会重复造轮子,这就大大降低了程序的可维护性和复用性。于是很多JavaWeb开发相关的 MVC 框架应运而生比如Struts2,但是 Struts2 比较笨重。随着 Spring 轻量级开发框架的流行,Spring 生态圈出现了 Spring MVC 框架, Spring MVC 是当前最优秀的 MVC 框架。相比于 Struts2 , Spring MVC 使用更加简单和方便,开发效率更高,并且 Spring MVC 运行速度更快。
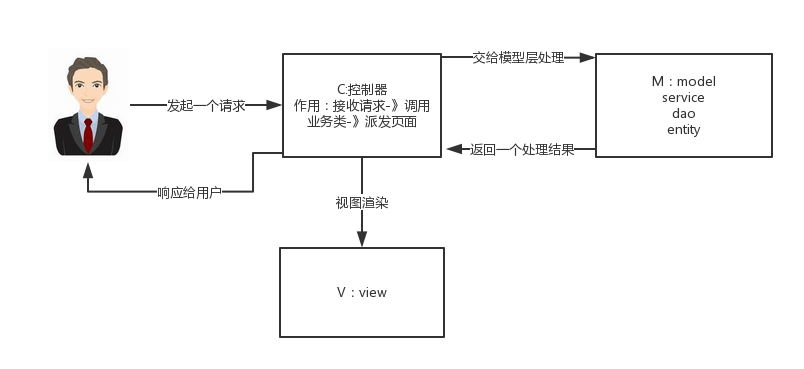
MVC 是一种设计模式,Spring MVC 是一款很优秀的 MVC 框架。Spring MVC 可以帮助我们进行更简洁的Web层的开发,并且它天生与 Spring 框架集成。Spring MVC 下我们一般把后端项目分为 Service层(处理业务)、Dao层(数据库操作)、Entity层(实体类)、Controller层(控制层,返回数据给前台页面)。
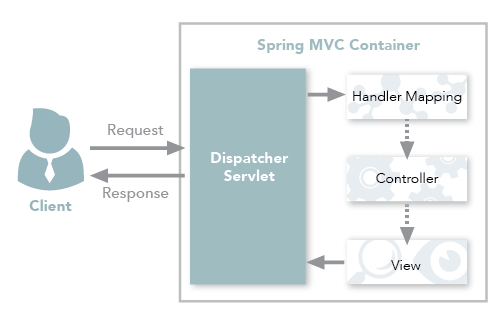
Spring MVC 的简单原理图如下:
原理如下图所示: 
上图的一个笔误的小问题:Spring MVC 的入口函数也就是前端控制器 DispatcherServlet 的作用是接收请求,响应结果。
流程说明(重要):
DispatcherServlet。DispatcherServlet 根据请求信息调用 HandlerMapping,解析请求对应的 Handler。Handler(也就是我们平常说的 Controller 控制器)后,开始由 HandlerAdapter 适配器处理。HandlerAdapter 会根据 Handler来调用真正的处理器开处理请求,并处理相应的业务逻辑。ModelAndView 对象,Model 是返回的数据对象,View 是个逻辑上的 View。ViewResolver 会根据逻辑 View 查找实际的 View。DispaterServlet 把返回的 Model 传给 View(视图渲染)。View 返回给请求者(浏览器)关于下面一些设计模式的详细介绍,可以看笔主前段时间的原创文章《面试官:“谈谈Spring中都用到了那些设计模式?”。》 。
BeanFactory、ApplicationContext 创建 bean 对象。jdbcTemplate、hibernateTemplate 等以 Template 结尾的对数据库操作的类,它们就使用到了模板模式。Controller。声明式事务又分为两种:
TransactionDefinition 接口中定义了五个表示隔离级别的常量:
支持当前事务的情况:
不支持当前事务的情况:
其他情况:
我们知道:Exception分为运行时异常RuntimeException和非运行时异常。事务管理对于企业应用来说是至关重要的,即使出现异常情况,它也可以保证数据的一致性。
当@Transactional注解作用于类上时,该类的所有 public 方法将都具有该类型的事务属性,同时,我们也可以在方法级别使用该标注来覆盖类级别的定义。如果类或者方法加了这个注解,那么这个类里面的方法抛出异常,就会回滚,数据库里面的数据也会回滚。
在@Transactional注解中如果不配置rollbackFor属性,那么事物只会在遇到RuntimeException的时候才会回滚,加上rollbackFor=Exception.class,可以让事物在遇到非运行时异常时也回滚。
关于 @Transactional注解推荐阅读的文章:
假如我们有有下面一个类:
1 | Entity(name="USER") |
如果我们想让secrect 这个字段不被持久化,也就是不被数据库存储怎么办?我们可以采用下面几种方法:
1 | static String transient1; // not persistent because of static |
一般使用后面两种方式比较多,我个人使用注解的方式比较多。
刚开始学习springboot的时候有一些自动配置的细节笔记,记录一下
在”pom.xml”文件当中,我们可以看到下面的配置
1 | <parent> |
这个是springboot的父项目,然后我们点击这个spring-boot-starter-parent,进入进去发现如下:
1 | <parent> |
还有一个父项目(套娃),继续点击spring-boot-dependencies,向下拉可以发现各种各样的依赖版本:

结论:
spring-boot-dependencies是Spring Boot的版本仲裁中心,一般来说我们导入依赖是不需要写版本的,基本上的依赖版本都会在spring-boot-dependencies进行管理,方便我们进行开发。
既然上面只是对版本进行管理,那么我们的依赖是怎么导入的呢?我们继续观察“pom.xml”,
我们可以看到这个依赖:
1 | <dependency> |
可以看到spring-boot-starter-web跟上面的spring-boot-starter-parent只是相差的后面,一个是web一个是start,这个在springboot当中还是挺常见的。
我们点击spring-boot-starter-web,发现很多和web相关的依赖,例如:json、tomcat等:

结论:
spring-boot-starter是spring-boot场景启动器,而spring-boot-starter-web帮我们导入了web模块正常运行所依赖的组件,其中依赖的版本都由spring-boot-starter-parent帮助我们进行仲裁。
类似的其实spring boot将所有功能场景都抽取了出来,做成了一个个starts,当我们需要什么时,只需要在项目当中引入这些starter就能将相关场景的依赖都导入进来,并且版本都不需要我们进行控制,因为版本在spring-boot-starter-parent当中就已经被控制了,所以说非常方便。比如说我们需要邮件开发的场景,我们就只需要导入spring-boot-starter-mail,他就把相对应的依赖导入进来。starters介绍的官方文档:传送门
主程序入口类是这样:
1 |
|
其中@SpringBootApplication:
Spring Boot应用标注在某个类上说明这个类是SpringBoot的主配置类,SpringBoot 就应该运行这个类的main方法来启动SpringBoot应用。
我们点开@SpringBootApplication,发现
1 |
|
@SpringBootConfiguration:
Spring Boot的配置类,标注在某个类上,表示这是一个Spring Boot的配置类。我们点击进去,会发现它是由@Configuration组成的,而@Configuration就是spring中的注解,标志一个配置类。
@EnableAutoConfiguration:
开启自动配置功能,加上@EnableAutoConfiguration之后,springboot能够帮助我们自动配置这个注解,相当于开启自动配置功能。
那@EnableAutoConfiguration具体是什么样的呢?我们点击@EnableAutoConfiguration进去,发现:
1 |
|
我们又发现了@AutoConfigurationPackage这个注解,我们继续点击进去发现:
1 |
|
我们发现了spring的底层注解@Import,该注解的作用是给容器中导入一个组件,组件由括号中的内容决定。也说明了@AutoConfigurationPackage是由@Import中导入的这个类起作用。
我们继续点击Registrar这个类,发现
1 | static class Registrar implements ImportBeanDefinitionRegistrar, DeterminableImports { |
我们在registerBeanDefinitions设置一个断点,然后调试


包结构:

发现metadata传入的就是主类,而(new AutoConfigurationPackages.PackageImport(metadata))则是得到了主类所在的包。这其实也就说明了@AutoConfigurationPackage的作用:==将主配置类(@SpringBootApplication标注的类)的所在包及下面所有子包里面的所有组件扫描到Spring容器==
接着我们发现在@AutoConfigurationPackage下面还有一个@Import({AutoConfigurationImportSelector.class})注解。我们点进AutoConfigurationImportSelector,发现这么一个函数
1 | protected AutoConfigurationImportSelector.AutoConfigurationEntry getAutoConfigurationEntry(AutoConfigurationMetadata autoConfigurationMetadata, AnnotationMetadata annotationMetadata) { |
同理设置断点调试

发现124个自动配置类

那么该类的功能就是将一些需要的配置类导入进来并且配置好,比如说我们需要aop功能,那么它就将aop的自动配置类org.springframework.boot.autoconfigure.aop.AopAutoConfiguration导入了进来,并且配置好。有了自动配置类,免去了我们手动编写配置注入功能组件等的工作。
其实Spring Boot在启动的时候从类路径下的META-INF/spring.factories中获取EnableAutoConfiguration指定的值,将 这些值作为自动配置类导入到容器中,自动配置类就生效,帮我们进行自动配置工作;以前我们在spring中需要自己配置的东西,自动配置类都帮我们完成了。整体的配置都在spring-boot-autoconfigure-2.2.6.RELEASE.jar中(springboot版本不同,这个可能版本也会不同)

spring.factories文件内容:

发现了前面调试的相同的内容
然后我们打开AopAutoConfiguration:

里面都是一些和配置相关的内容
结论:
@EnableAutoConfiguration:
@Import({AutoConfigurationImportSelector.class})注解将xxxAutoConfiguration类加入到容器当中首先我们需要找到这个类,我是使用idea按下ctrl+N就可以进行搜索

HttpEncodingAutoConfiguration的内容如下:
1 |
|
注解@Configuration,这个在这里有所讲解,就是给容器中添加组件,也对应了下面的@Bean注解
注解@EnableConfigurationProperties({HttpProperties.class}),作用是启动指定类的ConfigurationProperties功能,将配置文件中对应的值和HttpEncodingProperties绑定起来;并把HttpEncodingProperties加入到ioc容器中,并且我们看到HttpEncodingAutoConfiguration只有一个构造函数,就是将HttpProperties传入。
进入HttpProperties中,发现
1 |
|
而注解@ConfigurationProperties作用就是将配置文件中的内容注入到bean当中,说白了就是通过配置文件对HttpProperties对应的属性进行配置,可以看这个这个。这就说明了我们可以通过配置文件对HttpProperties进行配置然后影响到HttpEncodingAutoConfiguration这个类
结论:
springboot的底层帮组我们做了很多的配置,所以现在使用起来springboot比较简单,但是底层的原理还是需要知道一些的,也可以加深的理解。感觉看老师讲的挺好的但是自己来写又说不出来,可能是还是没有理解够吧。